Welcome to 2017!
Have you ever struggled to keep a game or application working as it evolves and as the complexity ramps up? Software is composed of a suite of interacting components that are wired together in a particular way. As the number of interacting components grows the wiring and the number of connections between components grows exponentially (a phenomenon known as Metcalfe's law).
How can we keep a handle on this complexity and carve-out some order from the chaos?
You should consider using dependency injection, a technique for automatically wiring together complex applications. This sounds like it might be what we need, however dependency injection can itself be complicated and difficult to understand. Try out any of the dependency injection frameworks for C# and you can be forgiven for thinking that dependency injection was some kind of rocket science.
In this series of articles I aim to explain dependency injection in simple terms. I'll try to convince you that dependency injection will help you manage complex applications. With working examples I'll show you how to use dependency injection with Unity.
In part 1 I explained what dependency injection is and I argued the benefits it can provide. In part 2 I examined various techniques that we seek to replace with dependency injection. In this post finally I'm going to show how to use scene-based dependency injection in Unity. I'll also discuss some performance considerations and at the end we'll consider an alternative to dependency injection.
Contents
generated with DocToc
- Contents
- My setup
- Unity example project
- Setup
- Lifecycle
- Examples
- Performance considerations
- Dependency injection alternative: the service locator pattern
- Conclusion
My setup
I am currently using Unity 5.3.4 and Visual Studio Community 2015.
Unity example project
Working Unity examples and code accompany this article are are available on github. Please get the code when you are ready to follow along with the examples presented below.
In this post I work though the scenes from the example Unity project. Note that each numbered example presented here has an associated scene and code that you can play in the Unity Editor. In each case you can look at the Unity Console to help understand what happened. Most of the examples show scene-based dependency injection in action. Some of the additional examples in the Unity project show what happens when an error occurs, they demonstrate what happens when the setup is wrong.
Setup
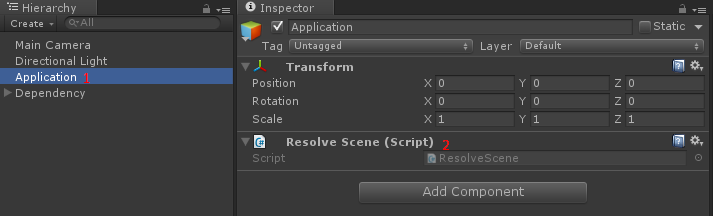
The heart of the dependency injection system can be found in the script DependencyResolver.cs. This is what scans the scene, finds injection points, searches for dependencies and ultimately establishes connections between the components. Most of the examples presented here have an Application game object [1] with a ResolveScene script attached [2]. This script is responsible for initialisation and dependency resolution for the entire scene:
The code for the ResolveScene script is rather simple: it uses DependencyResolver and invokes dependency resolution on the entire scene.
public class ResolveScene : MonoBehaviour
{
	void Awake()
	{
		var dependencyResolver = new DependencyResolver();
		dependencyResolver.ResolveScene();
	}
}
The real work here is performed by DependencyResolver whose implementation is fairly complex and I'm not going to explain it here. Let me know if you are interested in that and I might do a separate post for it.
Lifecycle
Note that dependencies are resolved in the call to Awake. Unity initialisation has two phases. First Awake is called for all scripts, followed by calls to Start. Please see the Unity docs for more information on script lifecycle. This means, at least in these examples, that dependencies are resolved during the Awake phase. Normally this would mean that we can't count on dependencies to have been initalised until the Start phase. This is because we can't predict the order of calls to Awake.
For example a script requiring injection might have its Awake called before Awake is called for the ResolveScene script. Now you can work around this by controlling the order of script execution, although I don't bother with this. I find it simpler to just follow this rule: Don't attempt to use any dependency within calls to Awake, wait until Start is called before attempting to use them.
Examples
Now let's work though the example Unity projects....
1. Injecting an object specified by type
The Inject attribute marks injection points. The following example expects to find a single Player object somewhere in the scene, if such an object is found it is automatically resolved. If no object is found, or more than one is found, then an error is added to the Unity log.
public class NPC : MonoBehaviour
{
	[Inject(InjectFrom.Anywhere)]
	public Player player;

	void Awake()
	{
        // Don't attempt to access 'player' here,
        // it may not be resolved yet.
	}

	void Start()
	{
		// Can access 'player' now, it will have been
		// resolved during the Awake phase of initialisation.
	}
}
Note that this also works for interfaces. For example you might choose to inherit Player from an IPlayer interface and inject the interface instead of the concrete class. Use of interfaces paves the way for the mocking that is used to properly isolate code for unit testing.
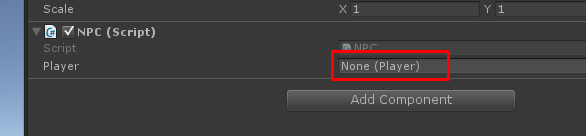
So how does this look in the Unity Editor? Prior to playing you can see that the Player field of the NPC script is empty:
Now see how this looks after playing:
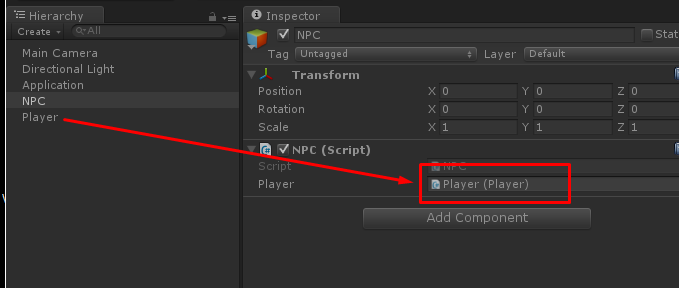
The Player object in the hierarchy has been automatically injected into the Player field of the NPC script.
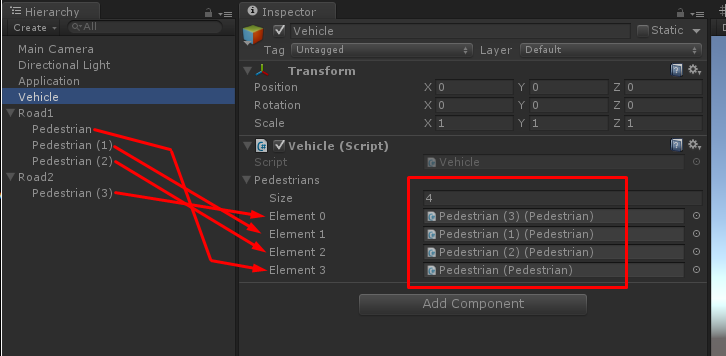
2. Injecting multiple objects specified by type
By changing the declaration of the injection point to an array we can request that multiple objects be injected. This next example expects to find zero or more Pedestrian objects in the scene and any that exist will automatically be injected as an array.
public class Vehicle : MonoBehaviour
{
	[Inject(InjectFrom.Anywhere)]
	public Pedestrian[] pedestrians;

	void Awake()
	{
		// Don't attempt to access 'pedestrians' here,
		// it may not be resolved yet.
	}

	void Start()
	{
		// Can access 'pedestrians' now, it will have been
		// resolved during the Awake phase of initialisation.
	}
}
Note that as in the previous example that this also works with interfaces.
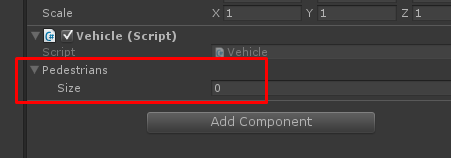
Let's check out how this looks in the Unity Editor. Before playing we have an empty array of pedestrians:
After playing the array has been filled automatically by the dependency resolver. Dependency injection has found all instances of Pedestrian from the hierarchy and plugged them into our array:
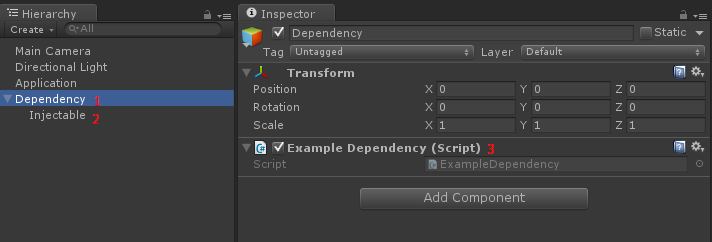
3. Hierarchy injection
Our previous examples showed how dependency injection can collect dependencies from anywhere in the scene. It is also useful to have dependencies injected from higher levels of the hierarchy, a prime example that comes to mind immediately is when you are building a UI. Imagine a leaderboard screen that is automatically passed down for any scripts lower in the hierarchy that require access it.
This simple example shows how to inject a dependency from a parent game object to a child object. Inject(InjectFrom.Above) injects dependencies from higher levels in the hierarchy:
public class ExampleInjectable : MonoBehaviour
{
	[Inject(InjectFrom.Above)]
	public ExampleDependency ExampleDependencyAsProperty { get; set; }

	[Inject(InjectFrom.Above)]
	public ExampleDependency ExampleDependencyAsField;

	// ...
}
Note that the same dependency will be injected twice, this is simply to demonstrate that both fields and properties can be injected, so long as they are public.
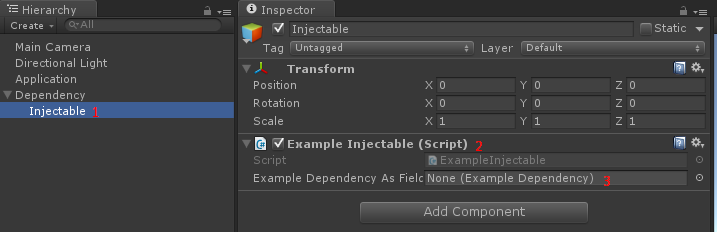
The scene is structured so that the Dependency game object [1] is in the hierarchy above the Injectable game object [2]. Here the child is directly under the parent, but in a real project it could be many levels deeper. The Dependency game object has a script attached called ExampleDependency [3], this is the MonoBehaviour that is to be injected into the child game object:
The Injectable game object [1] has a script attached called ExampleInjectable [2]. This has a field called Example Dependency As Field [3] that is to be injected. Note that before playing this field is set to None:
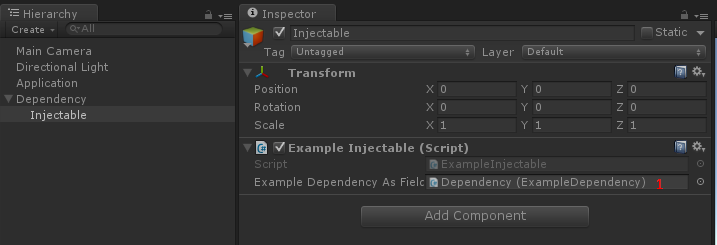
After hitting the Play button you will see that Example Dependency As Field has automatically been wired up (1).
There are other examples of hierarchy injection in the example Unity project. Including injecting by interface and polymorphic overrides. Please explore the code there to find out more.
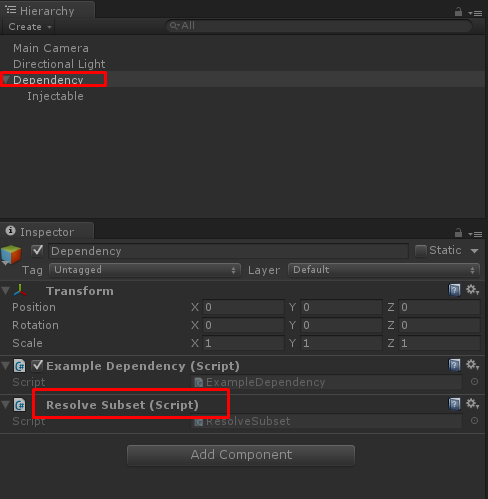
4. Scene subset
The last example for today's post demonstrates how to resolve dependencies for a reduced subset of the hierarchy. This might be useful if you don't want to resolve dependencies for the whole scene, say because you have a large scene and aren't happy with the performance of running injection on the entire scene.
You'll notice in this example that there is no Application game object. In the other examples it is the Application game object that initiates dependency resolution for the entire scene. In this example we use the Resolve Subset script to resolve dependencies only on a subset of the entire scene. The script is applied at the root of sub-tree that requires resolution, in this example it is added to the Dependency game object:
The code is very simple. It invokes DependencyResolver to apply dependency resolution to the current game object and its descendants:
public class ResolveSubset : MonoBehaviour
{
    void Awake()
    {
        var dependencyResolver = new DependencyResolver();
        dependencyResolver.Resolve(this.gameObject);
    }
}
Performance considerations
Now you are probably thinking: what kind of magic makes this possible?
Also, what must I pay for this magic?
The architectural payoff of dependency injection can be huge. It simplifies organisation and management of complex applications. However you have to be aware that this comes with some performance costs!
Reflection
C# dependency injection systems typically use C# reflection to do the automated wiring. Reflection is used for all kinds of interesting things: serialization, object factories, automated object synchronization and of course dependency injection. Unity uses reflection extensively under the hood, so to a certain extent if you are using Unity then you are already using reflection even if you don't know it.
Not everyone is going to like using reflection. Many people assume that use of reflection will result in poor performance. In at least some cases that will be right, so I won't dispute claims like this. However using dependency injection gives me such a productivity boost when building complex application that I'm willing to put up with less than perfect startup performance.
Normally I use dependency injection on start up and load and prefer not to use it at runtime unless it is triggered by a user initiated event where slightly less than the best performance can be tolerated. I've used reflection-based dependency injection in numerous Windows and Android applications and the performance has always proven tolerable.
If you aren't keen on reflection but still want to use dependency injection, you should instead consider using the service locator pattern, which I discuss in a moment.
Scanning the scene
In most of the examples that accompany this article the entire scene is scanned to find injection points and dependencies. If you are thinking that this is expensive then you would be correct. If you have a massive scene this may not be feasible, but don't throw out scene-based dependency injection just yet. As I demonstrated in example 4 it is possible to just invoke dependency resolution on subsections of the scene, thus reducing the cost of scene-based dependency injection for large scenes.
Dependency injection alternative: the service locator pattern
If you want many of the benefits of dependency injection without the potential performance issues you should instead consider the service locator pattern. This pattern is very simple to implement and is very effective, I used it extensively myself before I adopted full dependency injection.
What's the difference? With dependency injection the system understands what a component needs and automatically provides it. With the service locator pattern a component understands it's own dependencies and must ask the service locator to provide them. The service locator pattern usually operates with no magic. It doesn't require reflection and it doesn't need to scan the scene to automatically connect components. Typically this means you must write code to register and retrieve dependencies. This is more work than dependency injection, although it is still more productive then manual wiring.
If you are concerned about the performance or under the hood magic of dependency injection then the service locator pattern might be what you are looking for. If you are interested in it please let me know and I might dedicate a future post to it.
Conclusion
In this post I've showed how to use scene-based dependency injection with Unity. I've (hopefully) demonstrated that dependency injection doesn't have to be difficult to understand or use and isn't as scary as you might have thought.
My simple scene-based dependency injection for Unity gives many of the benefits of traditional dependency injection, in addition it fits well with Unity, is easy to integrate, has tolerable performance and, if you are building a complex application, it will help save your sanity!
Do you want to know about dependency injection? I've got plenty more to talk about, so please let me know if you are interested in traditional DI, test driven development or the implementation of DependencyResolver.
Thanks for reading.